Historic Homes, Modern Kitchens: A Boston Remodeler’s Guide
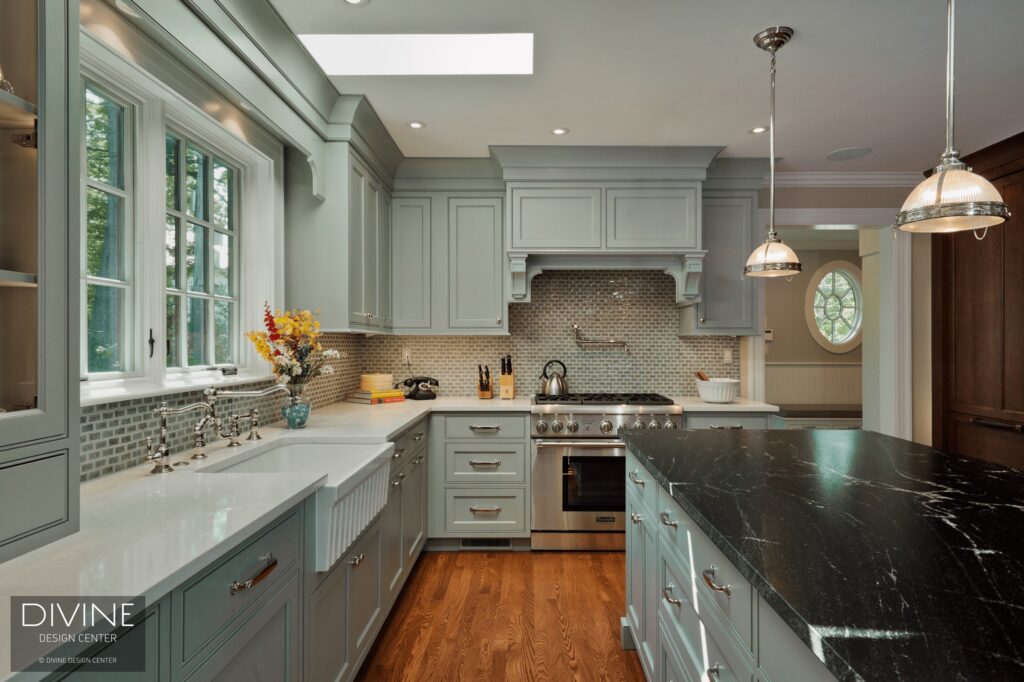
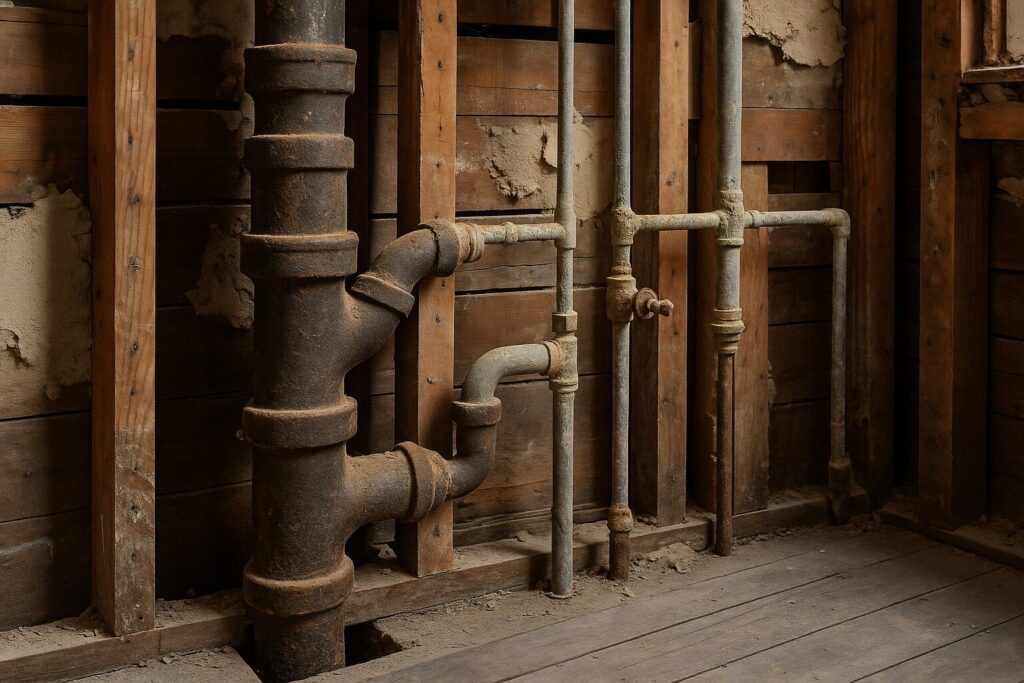
Historic Homes, Modern Kitchens: A Boston Remodeler’s Guide Preserving historic charm while integrating modern functionality is the ultimate balancing act in Boston kitchen renovations. Introduction At Golden Hammer Remodeling, we have a deep appreciation for the historic homes that define Boston’s character. From the Victorian townhouses of the South End to the classic Colonials of Concord, these properties are rich with history and architectural detail. However, the kitchens in these homes were not designed for modern life. They are often small, dark, and cut off from the rest of the house. The challenge—and the opportunity—is to create a kitchen that meets the needs of a 21st-century family without erasing the very character that makes the home special. This guide explores the unique challenges and solutions we’ve developed over years of renovating kitchens in historic Boston-area homes, helping you navigate the process of bringing modern convenience to your period property. 1. The Structural Puzzle: Working with Historic Constraints Historic homes are full of structural quirks. Load-bearing walls are not always where you expect them, floors are often uneven, and ceilings can be surprisingly low. Before we even think about cabinet styles or countertop materials, we must conduct a thorough structural assessment. This often involves working with a structural engineer to determine which walls can be moved or opened up to create the open-concept feel many homeowners desire. Common structural challenges we encounter include: •Plaster and Lath Walls: These are messy to demolish and often hide outdated knob-and-tube wiring. •Uneven Joists: Decades of settling can lead to sloped floors, requiring us to level the subfloor before installing new flooring or cabinetry. •Hidden Chimneys: Many older homes have decommissioned chimneys running through the walls, which can complicate layout changes. In a recent project in a Beacon Hill brownstone, we discovered an old brick chimney hidden behind a wall that the homeowners wanted to remove. Instead of seeing it as an obstacle, we exposed the brick and made it a stunning design feature, wrapping it with custom cabinetry to create a unique and functional focal point. 2. The Systems Update: Modernizing Electrical and Plumbing One of the most critical aspects of a historic kitchen renovation is updating the electrical and plumbing systems. The original systems were not designed to handle the demands of modern appliances like high-powered refrigerators, induction cooktops, and double ovens. A full systems upgrade is not just a matter of convenience; it’s a matter of safety. Here’s what a typical systems upgrade involves: 1.Replacing Knob-and-Tube Wiring: This outdated wiring is a fire hazard and must be completely replaced with modern, grounded wiring. 2.Adding Dedicated Circuits: Modern appliances require their own dedicated circuits to prevent overloads. We often add 6-8 new circuits in a historic kitchen renovation. 3.Upgrading the Electrical Panel: The original electrical panel often lacks the capacity for the new circuits, requiring an upgrade to a 200-amp panel. 4.Replacing Galvanized Pipes: Old galvanized steel pipes are prone to corrosion and low water pressure. We replace them with modern copper or PEX piping. This work is not glamorous, but it is the essential foundation of a safe and functional modern kitchen. It’s a significant part of the budget, but it’s an investment that protects your home and your family. 3. The Window and Door Dilemma: Preservation vs. Performance Windows and doors are key elements of a home’s historic character, but they can also be a major source of energy loss. The decision to restore or replace them is one of the most important in a historic renovation. In many of Boston’s historic districts, there are strict regulations about what can be done with original windows. Our approach is to preserve whenever possible. Original wood windows can often be restored to be surprisingly energy-efficient by adding new weatherstripping and a high-quality storm window. This preserves the original glass, which has a unique character that modern glass cannot replicate. When replacement is necessary, we use high-quality wood windows that are designed to match the original architectural style. In a recent project in a historic district of Winchester, we worked with the local historic commission to select a custom window profile that met their strict requirements while providing modern, double-pane energy efficiency. It’s a delicate balance, but it’s one we navigate frequently to ensure our clients get the best of both worlds. 4. The Aesthetic Balance: Blending Old and New The final and most visible challenge is creating a design that feels both fresh and appropriate to the home’s history. The goal is not to create a museum piece, but a functional kitchen that feels like a natural extension of the original home. We achieve this balance through careful material and style choices:• Cabinetry: Shaker-style cabinets are a timeless choice that works well in almost any historic home. We often use inset cabinet doors, which are characteristic of early 20th-century kitchens.• Countertops: Natural materials like marble, soapstone, and wood have a historic feel, but they require maintenance. Quartz countertops that mimic the look of natural stone are a popular and practical alternative.• Flooring: We often restore the original wood floors if they are in good condition. If not, we select new wood flooring that matches the species and plank width of the original.• Details: Details like crown molding, hardware, and light fixtures play a huge role in tying the new kitchen to the old house. We often draw inspiration from the home’s existing architectural details to inform these choices. Ready to Modernize Your Historic Kitchen? Renovating a kitchen in a historic Boston home is a complex but incredibly rewarding process. It requires a deep understanding of historic construction, a commitment to craftsmanship, and a creative approach to problem-solving. At Golden Hammer Remodeling, we specialize in this unique type of renovation. Contact us today for a consultation to discuss how we can bring modern convenience to your historic kitchen while honoring the character and history that make it special. Frequently Asked Questions (FAQ) 1. Do I need a special permit to renovate a kitchen in
The Rise of the Super Pantry: Boston’s New Favorite Kitchen Feature
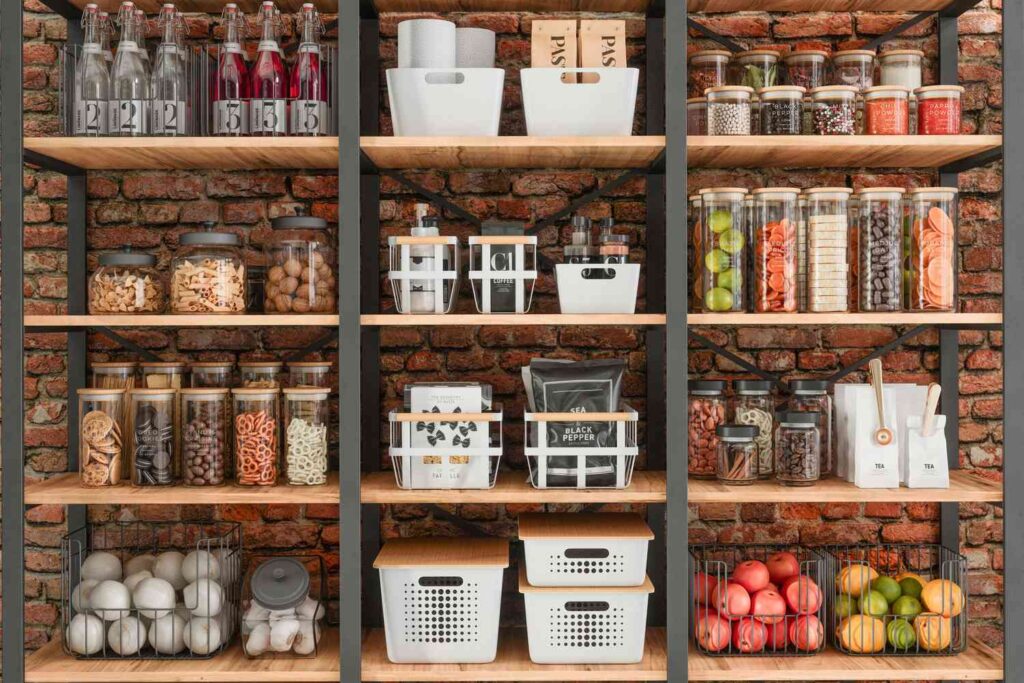
The Rise of the Super Pantry: Boston’s New Favorite Kitchen Feature Move over, minimalist kitchens—the walk-in pantry is back, and it’s more organized and stylish than ever. Introduction At Golden Hammer Remodeling, we’ve noticed a significant shift in kitchen design priorities among Boston homeowners. For years, the trend was toward sleek, minimalist kitchens with hidden storage. But today, a new feature is taking center stage: the “super pantry.” This isn’t your grandmother’s dusty closet of canned goods. The modern super pantry is a highly organized, beautifully designed walk-in or butler’s pantry that serves as a functional extension of the kitchen. From storing bulk items purchased at Costco to housing small appliances and creating a dedicated coffee bar, these spaces are transforming how Boston families use their kitchens. This guide explores why the super pantry is becoming a must-have feature and how you can incorporate one into your own kitchen renovation. 1. Why the Pantry Fell Out of Favor—And Why It’s Back In the post-war era, as processed foods became popular and homes got smaller, the traditional walk-in pantry was often sacrificed for more living space. Kitchens became showcases of modern convenience, with rows of upper and lower cabinets designed to hold just enough. However, our modern lifestyles have revealed the limitations of this model. Here’s why the super pantry is making a comeback: •Bulk Buying: Warehouse clubs like Costco and BJ’s have changed how we shop. Families are buying in bulk to save money and time, but a standard kitchen lacks the space to store 30 rolls of paper towels or a giant box of cereal. •Appliance Overload: From air fryers and stand mixers to espresso machines and blenders, our countertops have become cluttered with small appliances. A super pantry provides a dedicated home for these items, keeping countertops clear. •The Rise of the “Home Hub”: Kitchens are no longer just for cooking. They are offices, homework stations, and entertaining hubs. A pantry helps to declutter the main kitchen area, making it a more pleasant space for these other activities. 2. The Walk-In Pantry: Your Kitchen’s Backstage The most coveted type of super pantry is the walk-in pantry. This is a small room adjacent to the kitchen, often located in a space reclaimed from a closet, a mudroom, or even a small powder room. The beauty of a walk-in pantry is that it can be designed for pure function without worrying about aesthetics as much as the main kitchen. Key features of a functional walk-in pantry include: 1.Open Shelving: We recommend a combination of deep shelves (16-18 inches) for large items and shallow shelves (8-12 inches) for canned goods and spices. This ensures that everything is visible and easily accessible. 2.Durable Countertops: A stretch of countertop in the pantry is incredibly useful for unloading groceries or as a staging area for small appliances. We often use a less expensive but durable material like laminate or butcher block. 3.Smart Storage Solutions: We use a variety of organizational tools, from clear containers and turntables (Lazy Susans) to pull-out baskets and can racks, to maximize every inch of space. 4.Good Lighting: A single bare bulb won’t do. We install bright, functional lighting, often motion-activated, to ensure you can always find what you’re looking for. In a recent renovation in a Newton colonial, we converted a little-used back hallway into a 6×8 foot walk-in pantry. The homeowners now call it their “favorite room in the house,” as it has completely decluttered their main kitchen and made meal prep far more organized. 3. The Butler’s Pantry: The Entertaining Powerhouse A butler’s pantry is a more formal version of the super pantry, typically located in the transitional space between the kitchen and the dining room. Historically, this was where the butler would stage meals and polish silver. Today, it has been reimagined as the ultimate entertaining hub. A modern butler’s pantry often includes: •A Beverage Center: This is the perfect spot for a wine refrigerator, a coffee machine, and glassware storage. It allows guests to help themselves to drinks without getting in the way of the cook. •A Second Sink and Dishwasher: A small sink and a dishwasher drawer make cleanup after a party a breeze. You can stash dirty dishes out of sight from the main kitchen. •Elegant Cabinetry and Finishes: Unlike a purely functional walk-in pantry, a butler’s pantry is a showpiece. We often use glass-front cabinets, beautiful countertops, and a stylish backsplash to make it a jewel-box space. In a Wellesley home, we designed a butler’s pantry with dark blue cabinetry, a marble countertop, and a brass sink. It serves as a sophisticated cocktail bar during parties and a quiet coffee station in the mornings, adding a touch of luxury and immense functionality to the home. 4. Finding the Space: How to Carve Out a Pantry in Your Boston Home Creating a super pantry doesn’t always require a large home. With creative space planning, we can often find the necessary square footage in unexpected places. In the dense neighborhoods of Boston and Cambridge, where space is at a premium, this kind of creativity is essential. Here are some common strategies we use:• Steal from a Closet: A deep coat closet or linen closet adjacent to the kitchen can often be converted into a small but highly effective pantry.• Reconfigure a Mudroom or Laundry Room: We can often redesign a poorly utilized mudroom or laundry area to carve out space for a pantry.• Borrow from the Garage: If your garage is attached to the kitchen, we can sometimes claim a few feet of space to create a generous walk-in pantry.• Build a Cabinet Pantry: If a walk-in space isn’t possible, we can design a tall, deep cabinet with pull-out shelves and drawers that functions like a mini-pantry, providing a surprising amount of storage in a small footprint. Ready to Build Your Dream Pantry? A well-designed pantry is more than just storage; it’s a tool that can make your entire kitchen more functional, organized, and
Thanksgiving Kitchen Prep: Is Your Boston Home Ready for the Big Day?
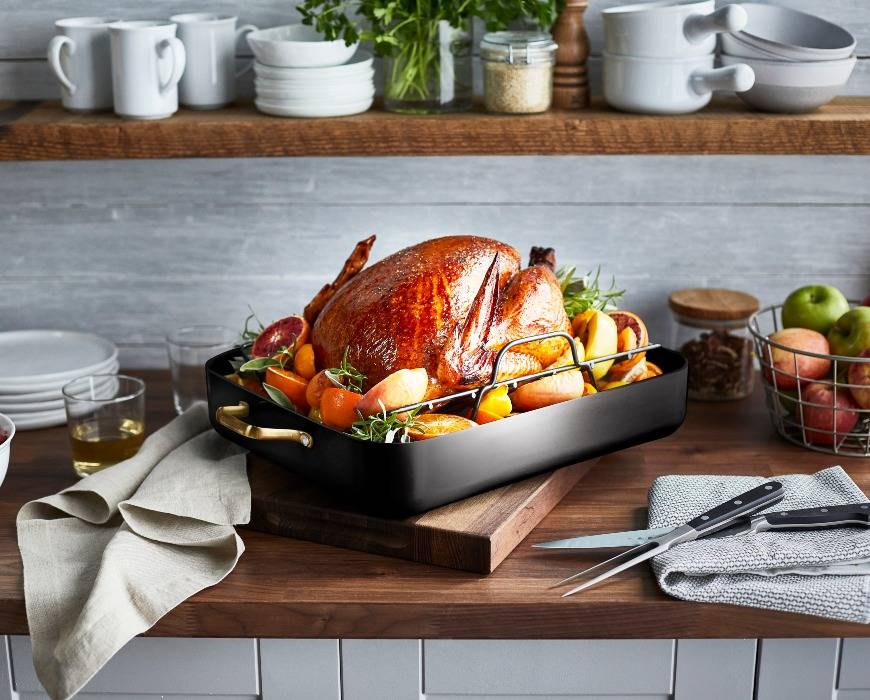
Thanksgiving Kitchen Prep: Is Your Boston Home Ready for the Big Day? The secret to a stress-free Thanksgiving isn’t just in the recipes—it’s in having a kitchen designed to handle the holiday rush. Introduction At Golden Hammer Remodeling, we know that Thanksgiving is the ultimate test of any kitchen. For Boston-area families, this cherished holiday means cooking for a crowd, juggling multiple dishes, and creating memories that last a lifetime. After completing hundreds of kitchen renovations from Brookline to Burlington, we’ve learned that the difference between a chaotic Thanksgiving and a joyful one often comes down to kitchen design. Whether you’re roasting a twenty-pound turkey in Newton or preparing a vegetarian feast in Cambridge, certain kitchen features make the holiday dramatically easier. This guide explores the design elements that transform your Thanksgiving from a stressful marathon into an enjoyable celebration where you actually get to spend time with your family instead of being trapped in the kitchen. 1. Double Ovens: The Thanksgiving Game-Changer If there’s one feature that consistently tops our clients’ wish lists after hosting their first Thanksgiving in a newly renovated kitchen, it’s double ovens. The traditional Thanksgiving menu requires precise timing—the turkey needs hours at 325°F, the casseroles need 375°F, and the pies need 350°F. With a single oven, you’re constantly shuffling dishes, adjusting temperatures, and hoping everything finishes on time. Double ovens solve this problem elegantly. We typically recommend a 30-inch double wall oven configuration, which provides two full-sized ovens stacked vertically. This allows you to roast your turkey in the lower oven while simultaneously baking side dishes in the upper oven at a different temperature. The convenience factor is enormous, and the stress reduction is even greater. In a recent Wellesley renovation, we installed double wall ovens for a family who hosts Thanksgiving for fifteen people every year. The homeowner told us it was “life-changing” and that she could finally enjoy cocktails with her guests instead of frantically managing oven space. The investment typically ranges from $2,500 to $6,000 for quality double wall ovens, plus installation, but for serious home cooks and holiday hosts, it pays dividends every single year. 2. Prep Sink: Your Secret Weapon for Multi-Tasking A second sink—often called a prep sink—is another feature that proves invaluable during Thanksgiving. While your main sink is occupied with a roasting pan or a pile of dishes, you need somewhere to rinse vegetables, fill pots, or wash your hands. A prep sink, typically 15-20 inches wide, provides this crucial additional workspace. We usually install prep sinks in one of three locations: •In the kitchen island – This is the most popular choice, creating a dedicated prep zone that keeps helpers out of the main cooking path. •In a butler’s pantry – Perfect for staging and cleanup, keeping the mess out of sight from guests. •At the end of a long counter run – Works well when an island isn’t possible but you still need that second water source. For Thanksgiving specifically, a prep sink becomes your vegetable washing station, your pot-filling station, and your hand-washing station all rolled into one. It keeps traffic flowing smoothly even when multiple people are working in the kitchen simultaneously, which is exactly what happens when your sister-in-law offers to help with the green beans while you’re basting the turkey. 3. Expansive Counter Space: Room to Breathe Thanksgiving requires an almost absurd amount of counter space. You need room for raw ingredients, prepped vegetables, cooling pies, resting turkey, serving platters, and all the chaos that comes with preparing a feast. We recommend a minimum of twenty linear feet of usable counter space for homeowners who regularly host large holiday gatherings. Here’s how we typically allocate counter zones for optimal Thanksgiving workflow: 1.Prep Zone (4-5 feet) – Near the sink and refrigerator for washing and chopping vegetables 2.Cooking Zone (3-4 feet) – Adjacent to the range for active cooking and stirring 3.Baking Zone (3-4 feet) – Near the ovens with room for mixing bowls and baking sheets 4.Staging Zone (4-5 feet) – For plated dishes waiting to go to the table 5.Landing Zone (2-3 feet) – Near the refrigerator for unloading groceries and storing leftovers Islands are particularly valuable because they provide accessible counter space from multiple sides. In a Lexington kitchen we renovated two years ago, we created a massive 10-foot island that the family now calls their “Thanksgiving command center.” The generous surface area accommodates multiple cooks working simultaneously without anyone feeling cramped. 4. Smart Storage: Everything Has Its Place Organization becomes critical when you’re cooking a complex meal with dozens of ingredients and specialty items you only use once a year. Thoughtful storage design means you can find what you need quickly, even in the heat of Thanksgiving preparation. This is where custom storage solutions prove their worth.The storage features that make the biggest difference for holiday cooking include:•Deep pot and pan drawers near the range for your largest roasting pans and stockpots•Vertical tray dividers for storing baking sheets, cutting boards, and serving platters•Spice pull-outs that keep dozens of spices organized and visible•A dedicated baking cabinet for flour, sugar, mixing bowls, and baking supplies•Corner solutions like LeMans units or magic corners that maximize awkward spacesFor Thanksgiving, having a designated “holiday entertaining” cabinet where you store your turkey platter, gravy boat, serving utensils, and special linens means you’re not frantically searching through multiple cabinets on Thursday morning. We often create these specialty storage zones in butler’s pantries or in tall pantry cabinets with custom organizational inserts. 5. Proper Ventilation: Keep Your Kitchen Comfortable This often-overlooked feature becomes crucial during Thanksgiving when you have multiple burners going, ovens running at full capacity, and a house full of guests. A high-quality range hood removes cooking odors, excess heat, and moisture, keeping your kitchen comfortable even during hours of intensive cooking. We recommend range hoods with a minimum of 600 CFM (cubic feet per minute) for serious home cooks, and even higher for professional-style ranges. The hood should extend at
Kitchen Lighting Done Right: Why Boston Homes Need More Than Recessed Cans
Kitchen Lighting Done Right: Why Boston Homes Need More Than Recessed Cans A layered lighting plan is the secret ingredient that transforms a good kitchen renovation into a truly exceptional one. Introduction At Golden Hammer Remodeling, we believe that a successful kitchen renovation appeals to all the senses, and none is more important than sight. While cabinets, countertops, and appliances get most of the attention, it’s the lighting that ultimately sets the mood and makes the space truly functional. After completing hundreds of kitchen renovations in historic Boston homes, from the low-ceilinged brownstones of Back Bay to the sprawling colonials in Newton, we’ve learned that a single type of lighting is never enough. Many homeowners believe a grid of recessed cans will suffice, only to find their new kitchen feels sterile or has frustratingly dark corners. The key to a warm, inviting, and highly functional kitchen is a layered lighting approach. This guide will walk you through the three essential layers of kitchen lighting—ambient, task, and accent—and how to combine them to create a space that is both beautiful and a joy to work in. 1. Ambient Lighting: The Foundation of Your Kitchen’s Glow Ambient lighting is the general, overall illumination that fills the room and makes it navigable. It’s the foundational layer upon which all other lighting is built. In many older Boston homes, a single, central ceiling fixture was expected to do all the work, which is simply inadequate for a modern kitchen. While recessed cans are a popular choice for ambient lighting, their placement and type are critical. We recommend using 4-inch or 5-inch recessed fixtures with a warm color temperature (2700K-3000K) to create a welcoming atmosphere. Rather than a simple grid, we strategically place them to wash walls with light and illuminate walkways, avoiding shadows in key work areas. For a 200-square-foot kitchen, you might need 6-8 recessed lights to achieve proper ambient levels. Another excellent option, especially for kitchens with higher ceilings, is a series of semi-flush mount fixtures or a central chandelier, which can add a decorative element while providing broad, diffused light. The goal is to create a soft, even glow that makes the entire kitchen feel comfortable and accessible, day or night. 2. Task Lighting: The Workhorse of Your Kitchen Task lighting is precisely what its name implies: focused light directed at specific work areas to ensure safety and precision for kitchen tasks. This is the most critical layer for functionality, and its absence is immediately felt when chopping vegetables, reading a recipe, or cleaning up. Relying on ambient light from overhead fixtures for these tasks will inevitably create shadows, as your own body will block the light source. Here are the most important areas for task lighting: • Under-Cabinet Lighting: This is non-negotiable in any modern kitchen renovation. We typically install LED strips or pucks under all upper cabinets to illuminate the countertops fully. This provides direct, shadow-free light for all your prep work. It’s the single most effective way to make a kitchen feel more functional. • Island or Peninsula Lighting: A pair or trio of pendants over a kitchen island is a classic choice for a reason. They provide excellent downward light for tasks and also serve as a key decorative element. The bottom of the pendants should hang approximately 30-36 inches above the countertop. • Sink Lighting: We often place a dedicated recessed light or a stylish flush-mount fixture directly over the sink. This area is one of the most heavily used in the kitchen, and dedicated lighting is essential for everything from washing dishes to prepping food. 3. Accent Lighting: The Finishing Touch That Adds Personality Accent lighting is the final, decorative layer that adds depth, drama, and personality to your kitchen. It’s used to highlight architectural features, display collections, and create visual interest. While not strictly necessary for function, it’s what elevates a kitchen from a purely utilitarian space to the true heart of the home. This is where you can truly express your personal style. Consider these popular accent lighting options: 1 In-Cabinet Lighting: Placing small LED lights inside glass-front cabinets turns your dishware or glassware into a beautiful display. It adds a sophisticated touch and a feeling of depth. 2 Toe-Kick Lighting: Installing a low-voltage LED strip under the base cabinets creates a soft, floating effect. It’s also a fantastic nightlight, providing a safe pathway through the kitchen in the dark without the need for harsh overhead lights. 3 Art & Architectural Lighting: If you have a piece of art, an exposed brick wall, or a unique architectural feature in your kitchen, a dedicated spotlight (a small, adjustable recessed fixture) can turn it into a stunning focal point. At Golden Hammer Remodeling, we’ve found that the most successful kitchen designs are those that thoughtfully integrate all three layers of lighting. It’s a detail that makes a world of difference in how you experience your new space every day. Ready to Illuminate Your Kitchen Project? Don’t let lighting be an afterthought in your renovation. A well-designed lighting plan is one of the best investments you can make in your kitchen. Contact Golden Hammer Remodeling today for a comprehensive consultation where we can design a lighting strategy that perfectly complements your Boston home’s architecture and your family’s lifestyle. Frequently Asked Questions (FAQ) 1. What is the difference between color temperature (Kelvins) and brightness (lumens)? Color temperature (measured in Kelvins or K) describes how warm (yellow) or cool (blue) the light appears. We recommend 2700K-3000K for a warm, inviting kitchen. Brightness (measured in lumens) is the amount of light produced. The right lumen level depends on the size of your kitchen and the specific lighting layer. 2. Are dimmer switches really necessary? Absolutely. We install dimmers on nearly every light source in the kitchens we remodel. They allow you to adjust the mood instantly, from bright and energetic
The Bathtub Dilemma: Should Your Boston Bathroom Keep It or Lose It?

The Bathtub Dilemma: Should Your Boston Bathroom Keep It or Lose It? Deciding whether to keep a bathtub is one of the most significant choices in a bathroom remodel, impacting daily life and future resale value. Introduction At Golden Hammer Remodeling, we’ve guided hundreds of Boston-area homeowners through the complexities of bathroom design, and no question comes up more frequently than, “Should I get rid of my bathtub?” From growing families in Winchester needing a practical place to bathe their children to empty-nesters in a Back Bay condo dreaming of a spacious walk-in shower, the answer is never one-size-fits-all. The trend towards luxurious, spa-like showers is strong, yet the practical necessity and perceived resale value of a tub create a genuine dilemma. This decision is especially critical in the Boston market, where bathroom footprints are often constrained by historic architecture. This guide will provide a clear framework for making the right choice for your home, your family, and your future. 1. The Case for the Walk-In Shower: Luxury and Accessibility The primary driver behind tub removal is the desire for a larger, more luxurious shower experience. A spacious walk-in shower with features like a rainfall showerhead, a built-in bench, and frameless glass doors can transform a cramped, utilitarian bathroom into a personal spa. For many of our clients, particularly in smaller city condos, removing a bulky tub-shower combo is the only way to achieve this. Accessibility is another powerful motivator. For homeowners planning to age in place, a curbless or low-threshold walk-in shower is a near necessity. It eliminates the hazard of stepping over a high tub wall, a common site of household accidents. We’ve completed numerous projects in neighborhoods like Belmont and Wellesley where the primary goal was creating a safe, stylish, and future-proof bathroom for homeowners who intend to stay in their homes for decades to come. 2. The Argument for Keeping a Tub: Resale Value and Family Needs The most common reason homeowners hesitate to remove their only bathtub is resale value. The long-standing advice from real estate agents is that a home needs at least one bathtub to appeal to the widest range of potential buyers, especially families with young children. While the market is shifting, this still holds true in many of Boston’s family-oriented suburbs. If you plan to sell your home within the next five years, and it’s the only full bathroom, removing the tub could be a financial misstep. The second major consideration is your own family’s needs. If you have young children, or plan to, a bathtub is practically indispensable. Likewise, many people simply enjoy a relaxing soak. Before you commit to a tub-free life, be honest about your habits. If a weekly bath is your go-to method for de-stressing, you will regret its absence, no matter how beautiful your new shower is. 3. The Hybrid Solution: When You Can Have It All For those with enough space, the ideal solution is often a separate tub and shower. This allows for a no-compromise, luxurious walk-in shower while retaining the practical and relaxation benefits of a bathtub. In larger master bathroom renovations, this is the most requested configuration. Freestanding tubs are particularly popular, serving as a stunning sculptural centerpiece for the room. However, in many Boston homes, space is a luxury. In these cases, a high-quality tub-shower combination is often the best choice. Modern alcove tubs are deeper and more comfortable than older models, and when paired with elegant tile and high-end glass doors, they can feel far from a compromise. Here is a simple decision framework: Your Situation Our Recommendation Reasoning Primary bathroom in a condo Lean towards Walk-in Shower Maximizes space and luxury for the primary user. Only full bathroom in a suburban home Strongly consider keeping a Tub Protects resale value for families. Have another bathroom with a tub Feel free to choose a Walk-in Shower You have the best of both worlds. Planning to age in place Strongly consider a Walk-in Shower Safety and accessibility are paramount. 4. The Boston Market Reality: What Local Real Estate Agents Are Seeing The Boston real estate market has its own unique characteristics that influence the tub-versus-shower decision. We’ve consulted with numerous local real estate agents who work in neighborhoods from Cambridge to Concord, and the consensus is nuanced. In urban condos and apartments, particularly in areas like South Boston, the North End, and downtown Boston, the lack of a bathtub is rarely a deal-breaker. Buyers in these markets tend to be young professionals or couples without children who prioritize modern, spa-like amenities. However, in the family-oriented suburbs—Newton, Lexington, Winchester, Wellesley, and Woburn—the story is different. Homes in these areas are primarily marketed to families, and the presence of at least one bathtub is still considered essential by most agents. If your home has multiple bathrooms, you have much more flexibility. Converting a master bathroom to a luxurious walk-in shower while keeping a tub in a secondary bathroom is often the ideal compromise. This approach allows you to enjoy the spa experience you crave while maintaining the broad market appeal that protects your investment. 5. Design Considerations: Making the Most of Your Choice Once you’ve decided whether to keep or remove your bathtub, the next step is to design the space to maximize both function and beauty. If you’re opting for a walk-in shower, consider incorporating features that enhance the experience. A built-in bench is not only practical for shaving or simply relaxing under the water, but it’s also a critical safety feature for aging in place. Multiple showerheads—a rainfall head overhead and a handheld wand—provide a customizable experience. Frameless glass enclosures create a sleek, open look that makes even a small bathroom feel more spacious. If you’re keeping or installing a bathtub, don’t settle for a basic builder-grade model. Modern alcove tubs are available in deeper, more ergonomic designs that make bathing a true pleasure. Freestanding tubs, while requiring more space, serve as a stunning focal point and come in a
Halloween Entertaining Made Easy: Kitchen Design Features Every Boston Host Needs

Halloween Entertaining Made Easy: Kitchen Design Features Every Boston Host Needs The secret to stress-free holiday hosting isn’t just in the decorations—it’s in having a kitchen designed for entertaining. Introduction At Golden Hammer Remodeling, we know that October brings more than just falling leaves to Boston neighborhoods—it’s the unofficial start of the entertaining season. From Halloween parties in Newton to Thanksgiving prep in Lexington, your kitchen becomes the command center for hosting family and friends. After completing hundreds of kitchen renovations across the Boston metro area, we’ve learned that the most successful party hosts aren’t necessarily the best cooks—they’re the ones with kitchens designed for entertaining. Whether you’re planning a Halloween bash for the kids or an elegant autumn dinner party, certain design features make hosting dramatically easier and more enjoyable. This guide explores the kitchen elements that transform you from a stressed-out host hiding in the kitchen to a relaxed entertainer who actually gets to enjoy their own party. 1. The Beverage Station: Your Secret Weapon for Halloween Parties One of the smartest entertaining features we incorporate into modern kitchen designs is a dedicated beverage station. This is especially valuable during Halloween, when kids want apple cider, adults want cocktails, and everyone needs constant refills. A well-designed beverage station keeps guests out of your main prep area while giving them easy access to drinks. The ideal beverage station includes a small sink, an under-counter refrigerator or wine cooler, and ample counter space for setting up a self-serve bar. We typically locate these stations at the end of an island or in a butler’s pantry area, creating a natural gathering spot that doesn’t interfere with cooking activities. For Halloween entertaining, this space becomes perfect for a punch bowl, a coffee station for cold Boston evenings, or a hot chocolate bar for trick-or-treaters. In a recent Wellesley project, we installed a beverage station with a farmhouse sink and a 24-inch beverage refrigerator. The homeowners reported that it completely transformed their holiday entertaining, allowing guests to help themselves while the hosts focused on food preparation. The investment typically ranges from $3,000 to $8,000 depending on the features included, but the convenience factor is priceless for frequent entertainers. 2. Open Sightlines: Stay Connected to Your Guests Nothing is worse than being trapped in a closed-off kitchen while your Halloween party happens in another room. This is why open-concept designs remain so popular among Boston homeowners who love to entertain. The ability to prep appetizers, refill drinks, and chat with guests simultaneously is invaluable during any gathering. However, true open-concept isn’t always possible or desirable in historic Boston homes. The solution we often recommend is creating strategic openings or pass-throughs that maintain visual connection without requiring major structural changes. A wide cased opening, a peninsula instead of a full wall, or even a large window between the kitchen and dining area can dramatically improve the entertaining flow. We also pay careful attention to the kitchen’s layout within an open space. Positioning the sink and primary prep area to face the living or dining area means you’re never turning your back on guests. During Halloween parties, this allows you to keep an eye on costumed kids in the next room while you’re plating treats or preparing dinner. 3. Ample Counter Space: The Staging Area for Success Counter space is always important, but during entertaining it becomes absolutely critical. You need room for food prep, serving platters, drinks, dirty dishes, and all the chaos that comes with hosting. We recommend a minimum of 15 linear feet of usable counter space for homeowners who entertain regularly, with at least one continuous stretch of 4-5 feet for staging. For Halloween specifically, this counter space becomes essential for: •Candy sorting and display stations for trick-or-treaters •Appetizer and dessert platters waiting to be served •Drink preparation area for cocktails or mocktails •Dirty dish staging away from food prep zones •Decorative displays that set the festive mood Islands are particularly valuable because they provide counter space that’s accessible from multiple sides. In a Cambridge kitchen we renovated last year, we extended the island by 2 feet, adding crucial surface area that the homeowners now say they “couldn’t live without” during their frequent dinner parties. 4. Smart Storage: Everything in Its Place, Even During Chaos The difference between a stressful party and a smooth one often comes down to organization. When you know exactly where everything is, you can focus on your guests instead of frantically searching for serving platters or wine glasses. This is where thoughtful storage design pays enormous dividends. Here are the storage features that make the biggest difference for entertainers: 1.Deep drawers near the range for pots and pans you’ll need for party cooking 2.A dedicated serving piece cabinet with vertical dividers for platters and trays 3.Glassware storage that’s accessible to guests (so they can help themselves) 4.A party supply zone for items you only use when entertaining—candles, cocktail napkins, serving utensils 5.Pull-out trash and recycling that’s easy to access when you’re juggling multiple tasks For Halloween entertaining, having a designated “party cabinet” where you store seasonal items—Halloween serving bowls, themed cocktail napkins, candles, and decorative pieces—means you’re not digging through multiple cabinets when it’s time to set up. 5. Lighting That Sets the Mood We discussed kitchen lighting in depth in another post, but it’s worth emphasizing how crucial it is for entertaining. The ability to adjust your lighting from bright and functional during food prep to soft and ambient during the party itself is a game-changer. This is where dimmer switches on every lighting circuit become essential. For Halloween entertaining specifically, layered lighting allows you to create the perfect spooky-but-not-scary atmosphere. Dimmed ambient lighting, accent lights highlighting seasonal decorations, and task lighting over the island where you’re serving create a warm, inviting space. Under-cabinet lights on dimmers can provide just enough glow for a sophisticated Halloween cocktail party, while pendant lights over the island can be brightened for a family-friendly gathering. In Boston’s historic
Boston Bathroom Renovations: The Hidden Costs Nobody Talks About
Boston Bathroom Renovations: The Hidden Costs Nobody Talks About Understanding the real expenses behind bathroom remodeling in historic New England homes can save you thousands in unexpected charges. Introduction At Golden Hammer Remodeling, we believe in transparency throughout the renovation process, especially when it comes to budgeting for bathroom projects in Boston’s historic housing stock. After completing hundreds of bathroom renovations from Back Bay brownstones to Cambridge triple-deckers, we’ve identified several cost factors that consistently surprise homeowners during the renovation process. These aren’t the obvious expenses like fixtures and finishes that appear in every renovation estimate. Instead, they’re the hidden infrastructure challenges that emerge once walls are opened and the true condition of a home’s mechanical systems becomes apparent. Understanding these potential costs upfront allows homeowners to budget appropriately and make informed decisions about their renovation scope. This guide explores the most common hidden expenses we encounter in Boston bathroom renovations, along with strategies for minimizing their impact on your project timeline and budget. 1. The Plumbing Reality: When Original Systems Meet Modern Expectations The most significant hidden cost in Boston bathroom renovations typically involves plumbing upgrades that become necessary once existing systems are exposed. Many homes in our service area were built between 1890 and 1940, when plumbing standards and materials were vastly different from today’s requirements. Cast iron drain lines, common in homes built before 1960, often appear functional until renovation work begins. However, these pipes frequently have internal corrosion that restricts water flow, even when external appearance suggests they’re in good condition. We’ve encountered situations where homeowners planned simple fixture updates but discovered that their drain lines needed complete replacement to accommodate modern low-flow toilets and high-efficiency fixtures. The cost implications can be substantial. Replacing a cast iron drain stack typically ranges from $3,000 to $8,000, depending on accessibility and the extent of replacement needed. In multi-story homes, this work often requires opening walls in multiple rooms to access the full length of the stack. We always recommend having a plumbing assessment conducted before finalizing renovation plans, particularly in homes built before 1950. Water supply lines present similar challenges. Original galvanized steel pipes, while often still functional, may have reduced internal diameter due to mineral buildup. This can result in poor water pressure to new fixtures, particularly in second-floor bathrooms. Upgrading to modern copper or PEX piping typically adds $2,000 to $5,000 to a bathroom renovation, but the improvement in water pressure and long-term reliability usually justifies the investment. 2. Electrical Upgrades: Meeting Modern Safety Standards Electrical work represents another significant hidden cost category, particularly in homes with original wiring systems. Many Boston-area homes built before 1940 still have knob-and-tube wiring, which, while not inherently dangerous when properly maintained, doesn’t meet current electrical codes for bathroom installations. Modern bathroom electrical requirements include GFCI protection for all outlets, dedicated circuits for high-draw appliances like heated floors or ventilation fans, and proper grounding for all fixtures. Homes with knob-and-tube wiring lack the grounding conductors required for these safety features. Upgrading bathroom electrical systems in these homes typically requires running new circuits from the main panel, which can add $2,000 to $4,000 to renovation costs. We’ve also encountered situations where existing electrical panels lack sufficient capacity for modern bathroom amenities. Adding heated floors, multiple high-wattage light fixtures, and powerful ventilation fans can exceed the capacity of older electrical services. Panel upgrades, while not always necessary, can add $3,000 to $6,000 to project costs when required. 3. Structural Surprises: The Foundation of Renovation Challenges Structural issues represent perhaps the most unpredictable category of hidden costs. Boston’s historic homes were built using construction methods and materials that differ significantly from modern standards. When bathroom renovations involve moving walls or changing floor plans, structural considerations often emerge.Floor joist modifications frequently become necessary when installing modern fixtures in locations that weren’t originally designed for plumbing. Moving a toilet, for example, may require cutting floor joists to accommodate new drain lines. This work requires careful engineering to maintain structural integrity and typically adds $1,500 to $3,000 to renovation costs.We’ve also encountered situations where bathroom floors have suffered water damage over decades, compromising the structural integrity of subflooring and even floor joists. This damage isn’t always visible until flooring is removed, but it must be addressed before new finishes can be installed. Subfloor replacement typically ranges from $800 to $2,500, depending on the extent of damage and accessibility. 4. The Ventilation Challenge: Addressing Moisture Control in Historic Homes Proper ventilation represents a critical but often overlooked aspect of bathroom renovations in historic homes. Many older homes lack adequate bathroom ventilation, relying instead on windows for moisture control. While this approach worked when homes were less tightly sealed, modern renovation practices require mechanical ventilation to prevent moisture-related problems. Installing new ventilation systems in historic homes often requires creative routing solutions. Unlike new construction, where ductwork can be planned during the framing stage, retrofit installations must work around existing structural elements. We frequently encounter situations where the most direct route for exhaust ducting is blocked by structural beams or existing mechanical systems. The cost of adding proper ventilation typically ranges from $800 to $2,500, depending on the complexity of the installation. However, this investment is crucial for preventing future moisture damage that could cost thousands to repair. We always include ventilation upgrades in our renovation recommendations, even when clients initially plan to rely on existing windows. 5. Hazardous Materials: The Legacy of Historic Construction Homes built before 1978 may contain lead paint and asbestos-containing materials, both of which require special handling during renovation work. While not every project encounters these materials, their presence can significantly impact renovation timelines and costs. Lead paint is particularly common in bathrooms of homes built before 1950, often found in multiple layers beneath more recent paint applications. When lead paint must be disturbed during renovation work, EPA regulations require specific containment and disposal procedures. These requirements can add $1,500 to $4,000 to renovation costs, depending on the extent of lead paint present.
Kitchen Islands That Work: Why Size Isn’t Everything in Boston Homes
Kitchen Islands That Work: Why Size Isn’t Everything in Boston Homes The most requested kitchen feature often becomes the biggest source of daily frustration—here’s how to get your island right. Introduction At Golden Hammer Remodeling, kitchen islands are by far the most requested feature in our Boston-area renovations. From the compact condos of South Boston to the spacious colonials of Newton, homeowners consistently ask for islands that maximize both storage and seating. However, after completing hundreds of kitchen renovations throughout the Boston metro area, we’ve observed a clear pattern: the most successful islands aren’t necessarily the largest ones. In fact, oversized islands often create more problems than they solve, particularly in the historic homes that define much of our local housing stock. The key to a functional island lies not in maximizing square footage, but in understanding how your family actually uses the kitchen and designing accordingly. This guide explores the practical considerations that determine whether an island enhances or hinders your daily kitchen experience, with specific insights drawn from our extensive work in Boston’s diverse neighborhoods. 1. The Traffic Flow Challenge: Navigating Boston’s Kitchen Layouts The primary issue with oversized islands stems from traffic flow disruption, a problem that’s particularly acute in Boston’s historic homes where kitchens were originally designed as separate, compact workspaces. When we retrofit these spaces with large islands, we often create bottlenecks that make simple tasks unnecessarily complicated. The National Kitchen and Bath Association recommends a minimum of 42 inches of clearance around islands, but in our experience working with Boston homes, 48 inches provides much more comfortable navigation. This becomes especially important when multiple people are using the kitchen simultaneously. We’ve found that islands longer than 8 feet in kitchens smaller than 200 square feet consistently create circulation problems, forcing family members to walk around the island to reach basic amenities like the refrigerator or sink. In a recent Newton project, we initially designed a 10-foot island for a family of four. During the planning phase, we conducted a “traffic simulation” where the family walked through their typical morning routine using cardboard mockups. The exercise revealed that the proposed island would force them to take circuitous routes to complete basic tasks like making coffee while someone else prepared breakfast. We redesigned with a 7-foot island that provided the same storage and seating while maintaining clear pathways throughout the kitchen. 2. The Seating Dilemma: Balancing Social Connection and Functionality One of the most common requests we receive is for island seating that accommodates the entire family. While this sounds ideal in theory, the reality is more complex. Islands with seating for more than four people often create what we call “the restaurant effect”—the cook becomes a server, working behind a counter while family members sit in a row facing away from the kitchen’s primary work areas. Our most successful island designs incorporate what we term “conversational seating”—typically 2-3 stools positioned at one end of the island, allowing seated family members to face both the cook and each other. This arrangement facilitates natural conversation while keeping everyone connected to the cooking process. We’ve found that L-shaped islands work particularly well for this purpose, providing ample prep space while creating an intimate seating area that doesn’t dominate the kitchen. In Cambridge, where many of our clients live in smaller condos, we often recommend peninsula configurations instead of traditional islands. Peninsulas provide similar functionality while maintaining better connection between the cooking and seating areas. They also require less floor space, making them ideal for the compact kitchens common in the area’s converted brownstones and triple-deckers. 3. Storage Optimization: Making Every Inch Count Boston homeowners often request large islands primarily for storage, but we’ve learned that smart storage design matters more than sheer volume. The most effective island storage combines easily accessible everyday items with specialized storage for less frequently used equipment.Our standard island design includes a combination of deep drawers for pots and pans, shallow drawers with dividers for utensils and small items, and at least one cabinet with adjustable shelving for versatile storage. We typically include electrical outlets on both sides of the island, positioned to be easily accessible but not visually prominent. For islands that include seating, we often incorporate storage cubbies beneath the overhang for items like placemats, napkins, or children’s art supplies.One particularly successful storage solution we’ve implemented in several Lexington homes involves creating a “command center” at one end of the island. This includes a small desk area with charging stations, mail sorting compartments, and calendar space. This approach acknowledges that modern kitchens serve as family communication hubs while keeping these functions organized and contained. 4. The Boston-Specific Considerations: Working with Historic Architecture Renovating kitchens in Boston’s historic homes presents unique challenges that significantly impact island design. Many of our projects involve homes built between 1880 and 1930, when kitchens were small, separate rooms designed for efficiency rather than socializing. Converting these spaces to accommodate modern open-concept living requires careful consideration of structural elements, mechanical systems, and architectural character. In Back Bay brownstones, for example, we frequently encounter situations where the ideal island placement conflicts with existing radiator locations or structural columns. Rather than fighting these elements, we’ve learned to incorporate them into our designs. We’ve created islands that wrap around columns, turning potential obstacles into design features. Similarly, we’ve designed islands with built-in radiator covers that maintain heating efficiency while creating additional counter space. The narrow lot sizes common throughout Boston also influence our island recommendations. In many cases, we find that galley-style kitchens with well-designed peninsulas provide better functionality than cramped spaces with oversized islands. We always conduct detailed measurements and create scaled floor plans that allow clients to visualize traffic patterns before finalizing island dimensions. Ready to Design an Island That Actually Works? If you’re considering adding an island to your Boston-area kitchen, let Golden Hammer Remodeling help you create a design that enhances rather than hinders your daily routine. Contact us today for a consultation that takes
The $50,000 Mistake We See in Every Back Bay Kitchen (And How to Avoid It)

The $50,000 Mistake We See in Every Back Bay Kitchen (And How to Avoid It) Introduction At Golden Hammer Remodeling, we’ve spent years transforming kitchens across Boston’s most iconic neighborhoods, from the grand brownstones of Back Bay to the historic colonials of Lexington. We’ve seen it all, but there’s one costly mistake we see homeowners make again and again, particularly in historic homes. It’s a mistake that doesn’t show up on Instagram or Pinterest, but it can quietly add $50,000 or more to a renovation budget, turning a dream project into a financial nightmare. This isn’t about choosing the wrong color cabinets or a trendy backsplash that will soon be dated. This is about a fundamental misunderstanding of what it takes to renovate a home that has stood for over a century. This guide will expose this common pitfall and give you the insider knowledge to avoid it, ensuring your kitchen remodel is a sound investment, not a costly lesson. 1. The Allure of the Aesthetic: The Mistake in Plain Sight The mistake is simple: falling in love with an aesthetic without understanding the architecture. Homeowners spend months curating their dream kitchen from glossy magazines and social media feeds, filled with images of sleek, open-concept spaces. They present these images to their contractor, expecting a straightforward execution. The problem? The kitchens in those images were likely built in new-construction homes in Texas or California, not in a 19th-century Boston brownstone. The hidden infrastructure of a historic home—the plumbing, the electrical, the structural beams—is a world away from that of a modern build. Forcing a modern aesthetic onto a historic frame without proper planning is where the costs spiral out of control. 2. The $50,000 Snowball: How Costs Escalate So, how does this initial oversight turn into a $50,000 problem? It’s a domino effect: 1.The Wall Comes Down: You want that open-concept kitchen, so you decide to remove a wall between the kitchen and dining room. But in a Back Bay brownstone, that wall is likely plaster and lathe, not drywall, and it’s almost certainly load-bearing. This requires a structural engineer, a massive steel beam, and extensive reinforcement of the surrounding structure. Cost: $15,000 – $25,000 2.The Plumbing Predicament: You want to move the sink to the new island. But the original cast-iron plumbing stack is located in that wall you just removed. Now, you have to re-route the plumbing, which may involve cutting into the ceiling of the unit below you (if you’re in a condo) or trenching through the original hardwood floors. Cost: $10,000 – $15,000 3.The Electrical Enigma: Your new kitchen design includes a dozen recessed lights, under-cabinet lighting, and a suite of high-end appliances. But your home’s electrical system is still knob-and-tube. A full electrical upgrade is now required, not just for the kitchen but for the entire home to meet modern code. Cost: $15,000 – $20,000 Suddenly, your cosmetic kitchen remodel has become a full-blown gut renovation, and you’ve blown past your budget before a single cabinet has been installed. 3. The Golden Hammer Solution: A Proactive, Architecture-First Approach How do you avoid this costly mistake? By flipping the script. Instead of starting with the aesthetic, start with the architecture. At Golden Hammer Remodeling, we employ an “architecture-first” approach to all our historic home renovations.• Comprehensive Initial Assessment: Before we even talk about cabinet styles, we conduct a thorough investigation of your home’s existing conditions. This includes a structural assessment, a plumbing and electrical evaluation, and a hazardous materials survey (for things like asbestos and lead paint).• Design with the Home, Not Against It: We design a kitchen that works with the unique character and constraints of your home, not against them. This doesn’t mean you can’t have a modern kitchen. It means we find creative solutions to achieve a modern aesthetic while respecting the home’s historic integrity.• Budget for the Bones: We allocate a portion of the budget specifically for infrastructure upgrades. This way, there are no surprises, and you can make informed decisions about where to invest your money. 4. Case Study: A Tale of Two Kitchens Consider two recent projects. One, a homeowner in Newton, came to us with a picture of a minimalist, all-white kitchen. Their 1920s colonial had a small, closed-off kitchen. Instead of removing walls, we widened the doorways and used glass pocket doors to create a sense of openness without major structural changes. We kept the sink in its original location, saving thousands in plumbing costs, and invested in high-end, period-appropriate fixtures that celebrated the home’s character. The result was a stunning, functional kitchen that respected the home’s history and stayed on budget. Another homeowner, in a South End condo, was adamant about removing a wall. Our initial assessment revealed that the wall contained the main plumbing stack for the entire building. We were able to work with the condo association and a team of engineers to re-route the plumbing, but it added a significant cost to the project. Because we identified this issue upfront, the homeowner was able to make an informed decision and adjust their budget accordingly. There were no surprises, and the final result was exactly what they wanted. Ready to Renovate the Right Way? If you’re considering a kitchen remodel in a historic Boston home, don’t let your dream turn into a financial nightmare. Contact Golden Hammer Remodeling today for a consultation. Our architecture-first approach will ensure that your new kitchen is a beautiful, functional, and sound investment that you’ll enjoy for years to come. Frequently Asked Questions (FAQ) 1. Can I still have an open-concept kitchen in a historic home? Yes, but it requires careful planning. We can help you determine if it’s feasible and what the structural and budgetary implications will be. 2. How do I know if my home has knob-and-tube wiring? If your home was built before 1940, there’s a good chance it has knob-and-tube wiring. We can perform an electrical inspection to confirm. 3. Is it
Sustainable Kitchen Remodeling: Eco-Friendly Choices for Environmentally Conscious Boston Homeowners
Sustainable Kitchen Remodeling: Eco-Friendly Choices for Environmentally Conscious Boston Homeowners Introduction Create a beautiful, functional kitchen that reduces your environmental impact while providing long-term cost savings through sustainable materials and energy-efficient design choices. At Golden Hammer Remodeling, we’ve witnessed a significant shift among Boston homeowners toward environmentally responsible renovation choices that align with both personal values and long-term financial benefits. Throughout Newton, Lexington, and the broader Boston metro area, families are increasingly seeking kitchen renovations that minimize environmental impact while maximizing functionality, beauty, and home value. Sustainable kitchen remodeling encompasses far more than simply choosing recycled materials – it involves a comprehensive approach to design, material selection, energy efficiency, and waste reduction that creates healthier living environments while reducing utility costs and environmental footprint. The most successful sustainable kitchen projects balance environmental responsibility with practical functionality, resulting in spaces that serve families beautifully while supporting broader environmental goals. Modern sustainable materials and technologies have evolved to offer performance and aesthetics that rival or exceed traditional options, making eco-friendly kitchen renovation an increasingly attractive choice for discerning homeowners who refuse to compromise on quality or style in pursuit of environmental responsibility. 1. Sustainable Cabinet Materials and Construction Kitchen cabinets represent the largest material investment in most kitchen renovations, making cabinet material selection crucial for environmentally conscious homeowners seeking to minimize their renovation’s environmental impact while ensuring long-term durability and beauty. Formaldehyde-free and low-VOC cabinet materials have revolutionized sustainable kitchen design by eliminating harmful chemical emissions that can affect indoor air quality for years after installation. Traditional particleboard and MDF cabinets often contain formaldehyde-based adhesives that continue releasing volatile organic compounds long after installation, but modern alternatives use safer binding agents that maintain structural integrity without compromising indoor air quality. At Golden Hammer Remodeling, we source cabinets constructed with formaldehyde-free cores and low-VOC finishes that meet strict environmental standards while providing the durability and beauty our clients expect from premium kitchen cabinetry. Reclaimed and recycled wood options provide stunning aesthetic appeal while giving new life to materials that might otherwise end up in landfills. Reclaimed barn wood, salvaged from historic New England structures, offers unique character and patina that cannot be replicated in new materials. These reclaimed materials often feature superior grain patterns and density compared to modern lumber, having been harvested from old-growth forests decades or centuries ago. Recycled wood products, manufactured from post-consumer waste wood, provide consistent quality and appearance while diverting waste from landfills and reducing demand for virgin timber harvesting. FSC-certified wood ensures that new wood products come from responsibly managed forests that maintain biodiversity, protect indigenous communities, and support sustainable harvesting practices. The Forest Stewardship Council certification provides third-party verification that wood products meet strict environmental and social standards throughout the supply chain. FSC-certified cabinet materials are widely available in popular species like maple, oak, and cherry, allowing homeowners to choose sustainable options without compromising on preferred aesthetics or functionality. Bamboo cabinetry represents an innovative sustainable option that grows rapidly and regenerates without replanting, making it one of the most renewable cabinet materials available. Modern bamboo cabinet construction techniques produce materials with strength and durability comparable to traditional hardwoods, while bamboo’s natural antimicrobial properties provide additional benefits in kitchen environments. The light, consistent grain pattern of bamboo complements both traditional and contemporary kitchen designs, offering versatility that works well with various aesthetic preferences. 2. Energy-Efficient Appliances and Systems Modern energy-efficient appliances significantly reduce both environmental impact and long-term operating costs, making them essential components of sustainable kitchen renovations that provide immediate and ongoing benefits to environmentally conscious homeowners. ENERGY STAR certified appliances meet strict efficiency guidelines set by the Environmental Protection Agency, using 10-50% less energy than standard models while maintaining superior performance. These appliances reduce greenhouse gas emissions and utility costs while often providing enhanced features and reliability compared to less efficient alternatives. At Golden Hammer Remodeling, we help clients select ENERGY STAR appliances that match their cooking habits and family needs while maximizing energy savings and environmental benefits. Induction cooktops represent the most energy-efficient cooking technology available, transferring energy directly to cookware rather than heating surrounding air like gas or traditional electric ranges. This direct energy transfer results in faster cooking times, more precise temperature control, and significantly reduced energy consumption compared to conventional cooking methods. Induction technology also improves kitchen air quality by eliminating combustion byproducts associated with gas cooking, creating healthier indoor environments while reducing energy costs. High-efficiency refrigeration technology has advanced dramatically in recent years, with modern refrigerators using 75% less energy than models from the 1970s while providing larger capacity and enhanced features. Variable-speed compressors, improved insulation, and smart temperature management systems maintain optimal food storage conditions while minimizing energy consumption. Many modern refrigerators also feature advanced water filtration systems that reduce reliance on bottled water, further supporting environmental goals. Smart appliance integration allows for optimized energy usage through automated scheduling and monitoring that reduces consumption during peak demand periods. Smart dishwashers can delay operation until off-peak hours when electricity rates are lower and grid demand is reduced. Smart ovens can preheat efficiently and maintain precise temperatures while using minimal energy. These intelligent systems often provide usage monitoring that helps homeowners understand and optimize their energy consumption patterns. 3. Sustainable Countertop and Flooring Options Countertop and flooring selections significantly impact both the environmental footprint and long-term performance of sustainable kitchen renovations, with modern eco-friendly options providing beauty and durability that rival traditional materials. Recycled glass countertops transform post-consumer glass waste into stunning surfaces that offer unique aesthetic appeal while diverting waste from landfills. These surfaces incorporate recycled glass from bottles, windows, and other sources into durable composite materials that resist stains, scratches, and heat while requiring minimal maintenance. The variety of available colors and patterns allows for customized designs that complement any kitchen aesthetic, from contemporary to traditional styles. Recycled paper composite countertops, made from post-consumer paper waste and non-petroleum-based resins, provide warm, natural-looking surfaces with excellent durability and workability. These materials can be cut, shaped, and finished like traditional wood surfaces